Showing posts sorted by relevance for query easter. Sort by date Show all posts

Wednesday, April 16, 2014

2nd Annual - What's In My Boy's Easter Baskets? 1st Annual - What's in Livvy's Easter Basket?

With Easter around the corner again this year, I am happy to share with you the bunnies agenda for the upcoming Sunday! If you have followed my posts, or know me as a person or just an OT, you are very aware of my feelings related to nutrition and my passion for health, which has grown exponentially in the past 10 years. I truly believe that the american diet is contributing to not only childhood obesity, diabetes and asthma, but also the ever-growing developmental challenges kids have today. Just because it's Easter, it is not an excuse to "drug" kids with a basket filled with genetically modified, processed sugar and food dyes. Be creative and think outside of the candy box.

First, my mom got all the kids these adorable Easter baskets from Personal Creations. When I just went to their website to give you the link, it shows there is still time to order before Sunday!
Now, for the boys. I did stick with the same trend as last year, but this year I went with Fish Sticks instead of Zoo Sticks to change it up a bit! These are just so great for working on fine motor skills, hand strengthening and promoting a correct grasp to help carry-over to holding a pencil, I couldn't resist. When you do use these with your kids, whether it's for eating, playing, or cleaning up small toys, such as Legos, please encourage them to use their "pinchers" getting the optimum fine motor gains from the activity.
Next on the list...playmobil has become a minor obsession in our house lately. Henry discovered a playmobil toy at our local (and amazing) bookstore in Manchester. Henry loved the toy because it was a toy that you could take apart, put together and pretend play with, and Lukey soon enjoyed playing with the playmobil too. I love them because they encourage using two hands together, have small, intricate parts requiring fine motor precision and strength, and they all have inter-changeable parts we are finding out as well! This Easter, I found that playmobil had these eggs for sale, so I purchased two, again at our local bookstore (support local and happy environment :) as there is no shipping required), but I am giving you the link to amazon, where they are also sold. I know the boys will be psyched! 
Lastly, I bought the boys new, re-usable snack and sandwich bags (happy environment :) These are great to use instead of plastic baggies, due to decreasing waste and they are also so much safer and healthier than the awful chemicals in plastic bags. I bought these at our local coop, but I previously bought some at Target and they are readily available in many locations, even some grocery stores. As with last year, I also bought the boys Lake Champlain chocolate carrots. Lake Champlain is a fair trade Vermont company, which makes me feel okay about splurging on the chocolate!

I also am going to make the boys homemade, vegan "peanut" butter cups. I don't have a picture because when I made these for a gluten free alternative when heading to a birthday parts a few weeks ago, they were not picture worthy! However, they tasted delicious. I am not saying that these are healthy, but they are much better than Reece's peanut butter cups. Here's what you need: 1. Enjoy Life Chocolate Chips 2. Organic Cashew Butter 3. Organic Coconut Palm Sugar 4. Himalayan Sea Salt - 4 ingredients, simple right! Melt the chocolate chips on the stove. While they are melting, stir the palm sugar and sea salt into the room temperature cashew butter. Once melted, pour a little of the chocolate to coat the bottom of a mini-muffin pan (lined with unbleached muffin liners), place a dollop of the cashew butter mixture on top of the chocolate and then cover with more chocolate. Place the tray in the fridge and voila, once cooled, you have an awesome indulgence. You can use peanut butter as well, but I like to limit the amount of peanut butter we eat due to the aflatoxin. One of my favorite websites, as my frequent readers and Facebook friends know, tappstips.com also has a tahini version of this, which really packs some health benefits into a small treat.

Now for Miss Livvy! Luke's basket was rather scant last year due to him being 1, so Liv's is looking the same, as she is just coming up on 5 months. Livvy is getting an amber necklace, to hopefully help with her teething (my kids all teeth ridiculously early!). I'm also getting her a "girly" book from again, our local bookstore, because there may come a time that she gets tired of reading up on her excavator's and front loaders! That's it that's all for Liv! 
Again, we will be cutting our Easter grass from construction paper instead of buying the fake grass from the store, which I feel is a waste. Cutting is also such a great skill to work on with kids, and when you are making Easter grass, you can just let them go wild with the blunt, kid-friendly scissors. Varying the paper (plain white, construction, oak tag) will also increase or decrease the resistance. This is great if you really want to work on hand strengthening or if your kids are older, give them the oak tag and a green crayon and leave the thin paper behind!

Enjoy your Easter everyone!

Friday, March 29, 2013

What's in my boys Easter baskets?

With Easter around the corner, I figured that I would share what an OT puts in her kids Easter baskets. Henry will be three and Luke will be one, both at the end of April. I am not against sugar every once in a blue moon, but a basket filled with sugar is a disaster for any kid. Here is what is on the Easter Bunnies agenda in our house this Sunday.

Henry's Basket:
  • ZOOSTICKS - Great for building fine motor strength and coordination.
  • VELCRO CATCH BALL SET - Works on eye/hand coordination, bilateral skills, strength pulling the ball off of the velcro, turn taking.
  • BUBBLES - Strengthens oral motor skills and is a great visual tracking activity. Also works on bilateral coordination (one hand holds bubbles while the other hand holds the wand) and fine motor skills (holding the wand) along with eye hand coordination. Have your child chase the bubbles, jump, squat and clap them and you have just added gross motor skills to this simple, wonderful activity of BUBBLES!
  • SOCKS - He just needs them! However, beginning by age 2, your children can be independent in putting on their own socks. This activity that needs to be done daily is such an amazing therapy task. It takes postural control, balance, bilateral coordination (using 2 sides of the body together in a coordinated manner), eye hand coordination, fine motor strength and control of how much force to use. So, you don't have to go buy socks for your kids Easter basket, but make them independent in putting them on!
  • EASTER GRASS - That we made by cutting small strips of construction paper. Cutting works on fine motor, visual motor and bilateral skills. 
  • Annie's fruit snack mix
  • Organic gummy bears
  • One small chocolate carrot & Reece's peanut butter bunny (I couldn't resist!)
Lukey's Basket: *Remember, he's not even 1!
  • A Small Ball - A great activity for infants. Works on bilateral skills, visual motor integration, visual tracking and turn taking
  • Bubbles - It's never too young to start and I love watching the boys interact when Henry blows bubbles to Luke as he chases them, visually tracks them and laughs!
That's it for Lukey! 

Happy Easter!

Sunday, March 17, 2013

Over the Rainbow to me Pot o' Gold


Just in case you were wondering what to do with all of those toilet paper rolls, here is a great idea! With St. Patrick's Day at your door, use the TP rolls, (which if you're not using for crafts, I hope you are at least recycling - happy environment :) to make a rainbow headed toward a pot of gold. Here's what you need:
  1. A wire hanger
  2. Toilet paper rolls
  3. Tape
  4. Paint
Start with your wire hanger -  pull it apart and then make it into an arc. 
Next, line your table with newspapers for your child/student, get an old egg carton and put a dollop of each color separately in it's own egg space - happy environment :) recycling 2 on this project! 
Have your child paint each toilet paper roll a color of the rainbow, set them aside on the newspapers you have laid out to dry.
Once they are dry, have your child help you string them onto the wire hanger. Use tape on the inside of the rolls to help them stay closer together.

To make your pot of gold, follow this link http://www.makeandtakes.com/make-your-own-pot-of-gold. What you will need is:
  1. A small terracotta pot or black pot that you may already have (you can use a larger one than shown on this link to fit the entire wire hanger rainbow)
  2. Easter Grass - Instead of buying Easter grass, cut up thin strips of green construction paper that you already have at home - happy environment :)
  3. This link calls for gold foil wrapped candies; however, instead of candies (since sugar is awful for our children) I used mixed nuts. You can also use jewels or gemstones to look like gold or fake gold.
From an OT perspective, what are you working on?
  • Fine motor skills - Even if your child is young, encourage a more mature grasp on the paint brush (instead of a thumbs down grasp or a fisted grasp), as shown above. If your child is older, encourage an even more mature grasp by having them hold with just the pad of their thumb and pointer finger with the paint brush resting on the knuckle of their middle finger
  • Visual-Motor skills - Eye hand coordination while painting and stringing the tp rolls
  • Bilateral skills - holding the toilet paper roll with one hand and painting with the other; stringing the tp rolls onto the hanger, cutting the green strips of construction paper holding with one hand and cutting with the other
  • Cutting - Again, even if you have a toddler at home, encourage a "thumbs up dude" grasp on the scissors
  • Color Recognition/Naming - Have fun naming and working on learning colors while painting the rainbow
  • Ethics! - Teach your kids about recycling and why it is important! happy environment :)

Happy St. Patty's Day Everyone!

Sunday, April 5, 2015

Pre-writing is FUN! Week #6

Happy Easter and welcome back after a few weeks off from working in the Apple Room due to in-services and illnesses, ugh!

This week, true to habit, the kids were seated in a circle and ready for "pass the putty!" Check out a previous post here where I talk about the benefits of theraputty and the activity that we have performed since week 1 of Pre-writing is FUN! After we chatted about weekend plans, we briefly spoke about proper pencil grip. The Apple Kids then told me whether they had a starting corner or middle starter letter to start their name, and most of them were right on! The Handwriting Without Tears® program uses a blue mat, chalkboard, stamp pad or shaded gray squares on paper to help kids understand where and how to build and draw their letters and numbers. This ensures good formational habits from the start and gets kids using uniform vocabulary too! A lot of what we have focused on in the Apple Room thus far is pre-writing activities, and these are great tools to use at home with your pre-schoolers! Please note that the following 3 images are from the hwtears.com website.

The kids then engaged in a warm-up worksheet getting them ready to draw the first letter in their name. The worksheets used are from the Get Set For School™program and My First School Book. For example, for the letter R, the page focuses on a diagonal line encouraging the children to work left to right and getting them ready for the diagonal on the R, the S pre-sheet has faded lines doing a little c and then a backwards c working to the next page to draw an S, you get the picture ;)

After the kids wrote the first letter in their name, we handed out name strips to write their whole name. Now, this is where the confusion began and this has been a topic of discussion between myself and the teachers since the start of our Pre-writing if FUN! program. When left to their own devices, the kids make formational errors, are not sure whether to write in upper or lower case and just try to make their name look like they've seen it, but they are really not sure how to go about writing the letters. For many, they have the first letter down pat because we have practiced this multiple times, but the rest of their names - challenging. I will give you my opinion on this, and what I have done with kids for over 10 years.

  • Developmentally, learning upper case letters first is appropriate for children. They need to make big lines, littles lines, big curves and little curves - it's not too tricky! They will more easily learn a top to bottom approach learning upper case letters first and will begin writing with good habits from the get go! 
  • When ready, it is important to begin teaching kids how to write their name case sensitive. Ideally, this will begin towards the end of their last pre-school year, for us, Apple Kids! However, some children truly may not be ready for this transition, and I think it is important to honor these children too. 
  • In transitioning to case sensitive name writing i.e. Henry vs. HENRY, it is also important to teach the children how to write their names - this is a skill that needs to be taught and with common cores changing, it seems that we get further and further away from teaching handwriting (this is especially true in the higher grades with teaching cursive writing). Again, incorporating multi-sensory approaches with drawing names in rice/sand, building with roll-a-dough, using the slate chalkboard, will help build good formational habits even with more challenging lower case letters.
  • Teaching upper case letters first is developmentally appropriate and children will be able to make the transition to writing their name case sensitive. From a motor memory perspective, the children can transition because they have learned how to make the letters properly, using multi-sensory approaches, at the right developmental stages.
I cannot say enough about The Handwriting Without Tears® program to help children learn so many skills necessary for learning handwriting in school. All of my previous posts have explained the many areas that we have focused on, so I will not go into it here. To end, follow this link to view a quick video of the kids singing a song from The Get Set For School™CD. It is a song that teaches kids to use a top to bottom approach for writing - Where do you Start your Letters?  Enjoy!


Friday, February 13, 2015

Pre-writing is FUN! Week #3

This week I got back in Henry's classroom, The Apple Room and had a great time. The more that I get to know these kids, the more I am finding out how unique each one is as an individual but how well they all work and have so much fun together as a class as well! They really are just a great bunch! 

Beginning our time this morning,  we sat in a circle and passed the putty again! Each child took a turn squeezing, pinching, and passing the putty. As mentioned in Week #1 blogpost,  Theraputty is a great tool to use for strengthening the hand and finger muscles, especially prior to coloring, writing, drawing. It can also be used as a calming modality for children who fidget with their hands often. It holds more resistance than play-doh providing children with more proprioceptive input and feedback. The children told me about their weekend plans, and it seems a lot may be headed to the mountain for some skiing and riding! Next, we sang a song from HWT® called Where Do You Start Your Letters? This song helps to teach children at a young age to use a top to bottom approach when writing uppercase letters. Starting at the top, and getting in the habit young, makes writing easier and more fluid for children.

After we took turns around the circle, I introduced the children to all of the stations that were set-up around the classroom. This weeks main focus was using sensory motor ways to build letters, and I had each child initiate with practicing the correct formation of the first letter in their name. Once they mastered that letter they could move and make other letters or make pictures. Please enjoy seeing the kids working below, and excuse the quality of some of the pictures! 

Station 1 - Mat Man™  
Please scroll down or click here to read week one's post of Pre-writing is FUN! to learn more about Mat Man™ .  

Station 2 - Building Letters with Wooden Pieces

The Handwriting Without Tears Program® uses wooden pieces to teach children how to make letters and about the vocabulary used (big line, little line, big curve, little curve). In week 1, the wooden pieces were introduced when building Mat Man™ , so many of the kids already knew the names of the pieces. The blue mat or Mat Man's™ body is used as a base  to help kids build their letters. I also taught children about the "starting corner" on the mat, which again, promotes beginning at the top! The kids did a great job at finding the correct wooden pieces and building their letters. The kids that have middle starting letters, such as A, J and S, adapted quickly as well and understood exactly where to begin building the first letter in their name. 

Station 3 - Writing Letters with Small Chalk Pieces
 After building their letters and increasing spatial awareness, the children next drew the first letter in their name. The pieces of chalk were purposely broken to encourage the children to utilize a more mature tripod grasp. Using chalk on paper incorporates a tactile component into the activity as well.  For the kids that needed extra help understanding proper letter formation, I had them make rainbow letters tracing over and over their initially drawn figure, improving motor memory! HWT® also uses chalk and small slate chalk boards in their program. The chalkboard also helps kids understand not only a top to bottom formation but eliminates reversals. As you can see with the construction paper, if you begin at the left, in the starting corner, you are unable to draw a letter backwards (i.e. B, D, b, d). Parents, if you do end up ordering some materials from HWT®, I encourage you to also buy the workbooks and teachers guide to use the vocabulary we have been using in the classroom. If your children are going to Flood Brook School next, they will continue with this vocabulary and program in Kindergarten.

Station 4 - Zoo Sticks
Zoo sticks are an awesome tool to help increase intrinsic hand strength and improve fine motor coordination. I've talked about them in my What's in My Kids Easter Baskets? posts. The kids were taught to use their "pinchers" instead of all 5 fingers or a fist, and every single one of them held the zoosticks properly! When kids hold the zoo sticks with their "pinchers" they are facilitating a pencil grasp. When they hold them improperly, they are not working to build the appropriate finger and hand muscles and quality over quantity is what is important here! There are a million activities that you can do with zoo sticks and they also work as a great clean up tool; think small legos!

Station 5 - Wikki Stix


I have to say that I think this may have been the favored station amongst all of the children! I know Henry came home and said this was his favorite and the kids were also asking to bring them home and make sure that I left some in the classroom for future use! Parents, you may be visiting Amazon and ordering a pack soon! The link takes you to the search page for Wikki Stix, so you can order as little or as many as you like! This station was a favorite with Mrs. Adams I think too, she was so excited to watch the kids independently build out their entire name when all we instructed them to do was build the first letter and then be creative from there! These kids rock!

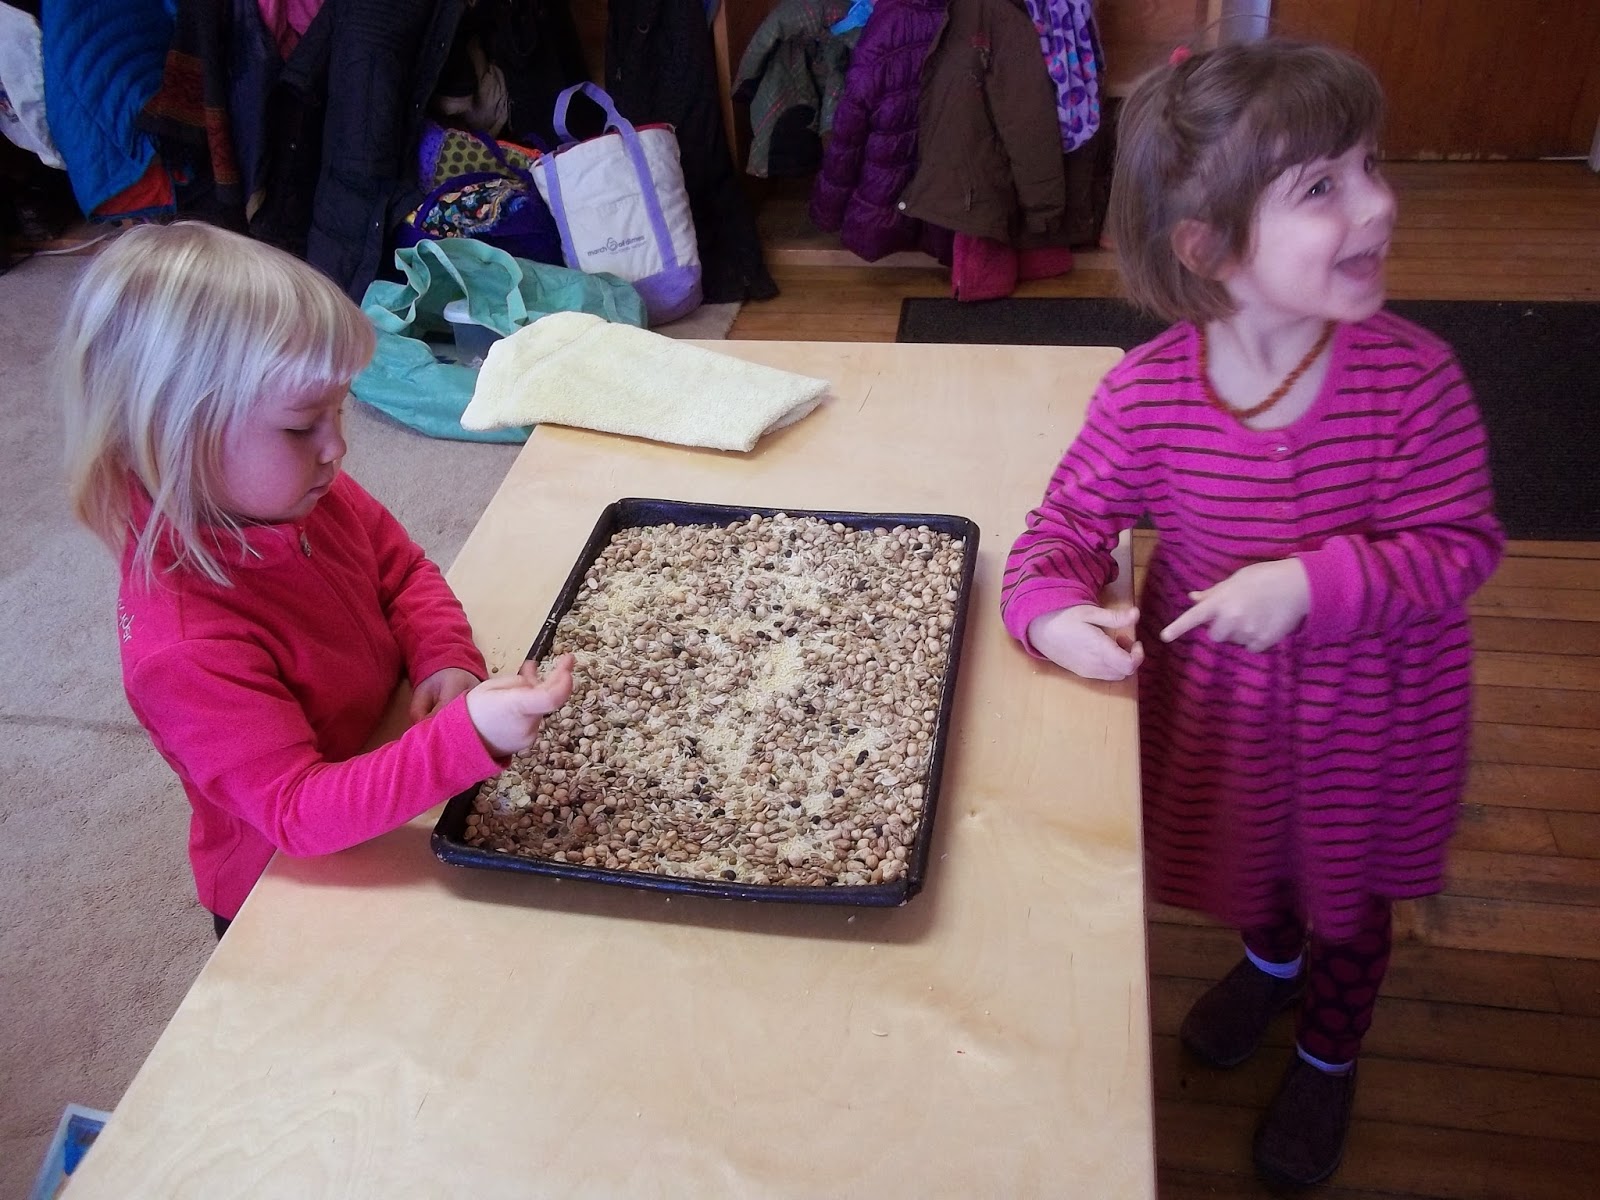
Station 6 - Rice & Beans (Lentils & Chic Peas too!)
The last station was a tray of rice and beans where the kids were encouraged to use their isolated pointer finger to draw the first letter in their name. We encouraged the students to start at the top, wherever that was for where they were standing, and for many, this had already become habit after only an hour of practicing! 

Multisensory experiences are wonderful to do with your pre-schoolers before getting to the pencil and paper, as developmentally some may not be 100% ready! Incorporating the senses increases the likelihood that kids will learn and retain information as well. It allows children to learn in different ways and neurologically, it allows the brain more opportunities to  store and integrate this information and retrieve it when moving to pencil and paper is appropriate and more consistent.

Looking forward to Pre-writing is FUN! Week #4 on February 27th. Hopefully, this gives everyone some fun, multisensory activities to do with your kids over President's Week!